操作系统内核实验
1. 实验内容
修改 Linux 0.00 源代码,使得它能够完成下面的功能
- 增加两个进程,使得整个操作系统有 4 个用户进程
- 修改 write_char 的功能,使得字符输出模式为滚屏
- 增加键盘中断,当按下键盘按键时,能够切换到相应的进程
2. 实验环境
| 项目 | 详情 |
|---|---|
| 实验平台 | Ubuntu 20.04 |
| 开发环境 | gcc-3.4, bin86, i386 等 |
| 环境参考 | https://github.com/Wangzhike/HIT-Linux-0.11.git |
| 实验工具 | bochs, Linux 0.00 源码 |
3. 代码分析
3.1. BOOT.S
BOOT.S 作为磁盘的引导程序,在 PC 启动,进入实模式后,会进行引导,关闭中断,并使得系统进入保护模式。
! now we want to move to protected mode ...ok_load:    cli         ! no interrupts allowed ! 关中断    mov ax, #SYSSEG    mov ds, ax          ! ds = 0x10000    xor ax, ax    mov es, ax          ! es = 0x0    mov cx, #0x2000    sub si,si           ! ds : si = 0x10000 : 0000    sub di,di           ! es : di = 0x00000 : 0000    rep                 ! 移动内存,0x10000 => 0x00000    movw    mov ax, #BOOTSEG    mov ds, ax          ! ds = 0x7c00    lidt    idt_48      ! load idt with 0,0    lgdt    gdt_48      ! load gdt with whatever appropriate
! absolute address 0x00000, in 32-bit protected mode.    mov ax,#0x0001  ! protected mode (PE) bit    lmsw    ax      ! This is it ! lmsw是加载机器状态字指令,后接16位寄存器或者内存地址    ! 其功能是用源操作数的低4位加载CR0,也就是说仅会影响CR0的低4位——PE, MP, EM, TS。    jmpi    0,8     ! jmp offset 0 of segment 8 (cs)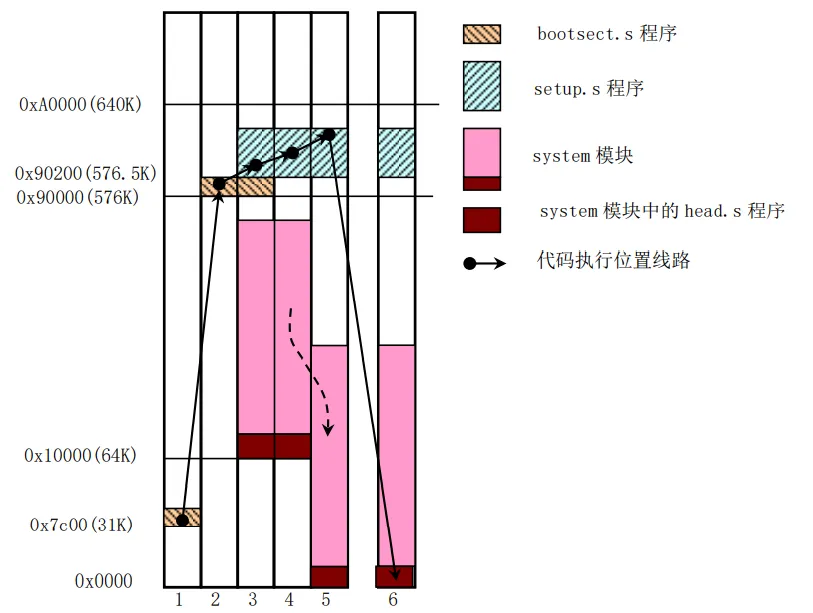
在其间,会将 IDT,GDT 加载。GDT 中,第一段不用,规定代码段和数据段。
gdt: .word 0,0,0,0 ! dummy ! 第1个描述符定义了一个代码段,其基地址为0,界限值是0x7FF(10进制2047), ! 粒度4KB,DPL=0,非一致性,可读可执行。因为粒度是4KB,所以段长度是(2047+1)*4KB=8MB .word 0x07FF ! 8Mb - limit=2047 (2048*4096=8Mb) .word 0x0000 ! base address=0x00000 .word 0x9A00 ! code read/exec 只读 .word 0x00C0 ! granularity=4096, 386 ! 第2个描述符定义了一个数据段,其基地址为0, ! 界限值是0x7FF(10进制2047),粒度4KB,DPL=0,向上扩展,可读可写。同上,段长度是8MB .word 0x07FF ! 8Mb - limit=2047 (2048*4096=8Mb) .word 0x0000 ! base address=0x00000 .word 0x9200 ! data read/write 可读可写 .word 0x00C0 ! granularity=4096, 3863.2. HEAD.S
HEAD.S 是运行在保护模式下的代码,它会加载各个数据段寄存器,重新设置 256 项 IDT,指向一个只会输出字符 C 的哑中断子程序 ignore_int。
setup_gdt:    lgdt lgdt_opcode        # 加载 GDT    ret
setup_idt:    lea ignore_int,%edx     # 哑中断基址 => %edx    movl $0x00080000,%eax   # cs = 0x0008    movw %dx,%ax            # selector = 0x0008 = cs    movw $0x8E00,%dx        # interrupt gate - dpl=0, present    lea idt,%edi            # 中断向量表基址 => %edi    mov $256,%ecx           # 循环次数rp_sidt:                    # %eax 中放了 cs:哑中断基址    movl %eax,(%edi)        # 将哑中断门描述符存入表中    movl %edx,4(%edi)    addl $8,%edi    dec %ecx    jne rp_sidt             # 将 256 个中断全部置为哑中断    lidt lidt_opcode        # 加载中断描述符表寄存器值    ret
更改 GDT 表,其中需加载进程的 TSS 和 LDT。
gdt:    .quad 0x0000000000000000    # NULL descriptor           # 第 0 号不用    .quad 0x00c09a00000007ff        # 8Mb 0x08, base = 0x00000  # 第 1 号只读代码段    .quad 0x00c09200000007ff        # 8Mb 0x10                  # 第 2 号可读可写数据段    .quad 0x00c0920b80000002        # screen 0x18 - for display # 第 3 号为显存
    .word 0x0068, tss0, 0xe900, 0x0 # TSS0 descr 0x20    .word 0x0040, ldt0, 0xe200, 0x0 # LDT0 descr 0x28    .word 0x0068, tss1, 0xe900, 0x0 # TSS1 descr 0x30    .word 0x0040, ldt1, 0xe200, 0x0 # LDT1 descr 0x38
更改 GDT 后重新加载所有的段寄存器,而后初始化 8253 计数器。
在以上工作完成后,重新更改 时钟中断(中断向量号 0x08) 和 系统中断(中断向量号0x80),使得他们能够正常响应。在这一步,其实初始化了内核。
## setup timer & system call interrupt descriptors. movl $0x00080000, %eax # cs = 0x0008 movw $timer_interrupt, %ax # %eax 中放时钟中断基址 movw $0x8E00, %dx # (?) movl $0x08, %ecx # 时钟中断向量号为 08H lea idt(,%ecx,8), %esi # 更改第 8 项中断(每个中断占 8 Byte) movl %eax,(%esi) movl %edx,4(%esi) movw $system_interrupt, %ax # 系统中断基址 movw $0xef00, %dx # 没有做模式切换, 状态没有从 11B 变为 00B (?) movl $0x80, %ecx # 系统中断向量号为 80H lea idt(,%ecx,8), %esi # 更改系统中断 movl %eax,(%esi) movl %edx,4(%esi)最后,为 task0 的启动做一些准备。
## Move to user mode (task 0) 为启动任务 0 做准备 pushfl # eflags 入栈 andl $0xffffbfff, (%esp) # 置 flag, 中断位清零 popfl movl $TSS0_SEL, %eax ltr %ax # 加载 TSS movl $LDT0_SEL, %eax lldt %ax # 加载 LDT movl $0, current # 准备启动 0 sti # 开中断 pushl $0x17 # 压 ss pushl $init_stack # 压用户栈, init_stack 成为 task0 的用户栈 pushfl # 压 eflag pushl $0x0f # 压 cs, cs 末 2 位为 11B, 即进入 11 用户级(00 为内核级) pushl $task0 # 压 eip iret # 返回时自动弹出, 进入 task0, 因此 tss0 表内容得以初始化至此,Linux 0.00 的系统启动完成,task0 开始执行,init_stack 也成为了 task0 的用户栈。在时钟中断发生时,task0 和 task1 会轮流被调度,其过程中会调用系统中断,并输出字符 A 或 B。
4. 具体实现
主要对 HEAD.S 进行修改,实现目标功能。
4.1. 增加两个进程
定义 task2 和 task3 的任务状态段和 LDT。
TSS2_SEL = 0x40 # 任务状态段 2, 占 8 ByteLDT2_SEL = 0x48 # 局部描述符表 2, 占 8 ByteTSS3_SEL = 0x50 # 任务状态段 3, 占 8 ByteLDT3_SEL = 0x58 # 局部描述符表 3, 占 8 Byte在 LDT 和 GDT 加载时,进程的栈空间得以加载,因此需要在 GDT 中增加进程的 TSS 和 LDT 表项。
gdt: .quad 0x0000000000000000 # NULL descriptor # 第 0 号不用 # ... .word 0x0068, tss2, 0xe900, 0x0 # TSS2 descr 0x40 # 进程 2 .word 0x0040, ldt2, 0xe200, 0x0 # LDT2 descr 0x48 .word 0x0068, tss3, 0xe900, 0x0 # TSS2 descr 0x50 # 进程 3 .word 0x0040, ldt3, 0xe200, 0x0 # LDT2 descr 0x58添加进程段,此处展示进程 2 的表项,进程 3 与之类似。
.align 8ldt2:   .quad 0x0000000000000000    # 0 号不用    .quad 0x00c0fa00000003ff        # 0x0f, base = 0x00000, 1 号只读    .quad 0x00c0f200000003ff        # 0x17                  2 号可读可写
tss2:   .long 0                         /* back link */    .long krn_stk2, 0x10                /* esp0, ss0 */    .long 0, 0, 0, 0, 0                 /* esp1, ss1, esp2, ss2, cr3 */    .long task2, 0x200                  /* eip, eflags */    .long 0, 0, 0, 0                    /* eax, ecx, edx, ebx */    .long usr_stk2, 0, 0, 0             /* esp, ebp, esi, edi */    .long 0x17,0x0f,0x17,0x17,0x17,0x17 /* es, cs, ss, ds, fs, gs */    .long LDT2_SEL, 0x8000000           /* ldt 段选择符, trace bitmap */
    .fill 128,4,0krn_stk2:
添加进程 2 和进程 3 的“主代码”,并定义用户栈。
task2:    movl $0x17, %eax    movw %ax, %ds               # 使用 ldt 表的第 2 项    mov $68, %al                # %al 中放入 D 的 ASCII 码    int $0x80                   # 调用系统中断, 输出字符    movl $0xfff, %ecx1:  loop 1b                     # 延迟    jmp task2
task3:    movl $0x17, %eax    movw %ax, %ds               # 使用 ldt 表的第 2 项    mov $69, %al                # %al 中放入 E 的 ASCII 码    int $0x80                   # 调用系统中断, 输出字符    movl $0xfff, %ecx1:  loop 1b                     # 延迟    jmp task3
    .fill 128,4,0usr_stk1:    .fill 128,4,0usr_stk2:    .fill 128,4,0usr_stk3:
修改时钟中断处理程序,使之能够在任务 0 到 3 之间轮流调度。
.align 2timer_interrupt:        # 时钟中断 (TODO)    push %ds    pushl %eax          # 保护现场    movl $0x10, %eax    mov %ax, %ds        # 使用 gdt 表的第 2 项    movb $0x20, %al     #    outb %al, $0x20     # 8259A 恢复中断
    movl $0, %eax    cmpl %eax, current  # 判断当前进程是否为 0    je 1f               # 为 0 则跳到 1 处, 切换为进程 1
    movl $1, %eax    cmpl %eax, current  # 判断当前进程是否为 1    je 2f               # 为 1 则跳到 2 处, 切换为进程 2
    movl $2, %eax    cmpl %eax, current  # 判断当前进程是否为 2    je 3f               # 为 2 则跳到 3 处, 切换为进程 3
    movl $3, %eax    cmpl %eax, current  # 判断当前进程是否为 3    je 4f               # 为 3 则跳到 4 处, 切换为进程 0
1:    movl $1, current    # 设置进程为 1    ljmp $TSS1_SEL, $0  # 跳转到进程 1, 存下当前快照    jmp 5f2:    movl $2, current    # 设置进程为 2    ljmp $TSS2_SEL, $0  # 跳转到进程 2, 存下当前快照    jmp 5f3:    movl $3, current    # 设置进程为 3    ljmp $TSS3_SEL, $0  # 跳转到进程 3, 存下当前快照    jmp 5f4:    movl $0, current    # 设置进程为 0    ljmp $TSS0_SEL, $0  # 跳转到进程 0, 存下当前快照5:    popl %eax           # 恢复现场    pop %ds    iret
4.2. 将字符的显示模式更改为“滚屏”
显存的起始地址为 0xb8000,而显示器为 共 2000 个字,每个字的高字节 放 ASCII 码,低字节放显示的颜色。
此处,主要修改 write_char 子程序的代码,思路如下:
- 当光标移动到最下方时,将这些字符全部向上移动一行,并将最下面一行清空
- 将光标移动到最下面一行的行首
write_char:    push %gs                # 保存现场    pushl %ebx    mov $SCRN_SEL, %ebx     # 显存的段选择子    mov %bx, %gs            # 放入 %gs    mov scr_loc, %bx        # %bx 中放光标位移(其实是偏移)    shl $1, %ebx            # 左移, 写高字节(高字节表示 ASCII 码值)    movb %al, %gs:(%ebx)    # 将 %al 的内容写到光标处    shr $1, %ebx            # 右移恢复    incl %ebx               # 指针后移    cmpl $2000, %ebx        # 与 2000 相比    jb 2f                   # 如果 ebx < 2000, 则跳转到 2f    call roll_screen        # 大于等于 2000 时,调用 roll_screen    movl $1920, %ebx        # 最下面一行的行首2:  movl %ebx, scr_loc      # 直接将 ebx 赋值给 scr_loc, 返回    popl %ebx               # 恢复现场    pop %gs    ret
.align 2roll_screen:    # ebx >= 2000 时, 将屏幕上的字符向上滚动    push %ds    mov $SCRN_SEL, %ebx     # 获取显存段地址(0xb8000)    mov %bx, %ds    mov %bx, %es    movl $160, %ebx    movl %ebx, %esi         # DS:esi (源地址)    movl $0, %ebx    movl %ebx, %edi         # ES:edi (目的地址)    movl $1920, %ecx        # 循环次数    cld                     # 清除增量位(向后移动, 即 si <= si + 2, di <= di + 2)    rep    movsw                   # 使用 rep 指令前缀, 用 movw 搬动字符
    movl $80, %ecx          # 将最下面一行清空    pushl %eax    movl $0x0700, %eax      # 背景色黑, 前景色白, 字符为 00H    cld    rep    stosw                   # 将 ax 寄存器的内容送到 di 指向的单元中    popl %eax    pop %ds    ret
另外,在进程切换的过程中,也会出现一些例如空行的问题。其原因如下:
- 全局变量
scr_loc代表光标的偏移位置,这个变量为所有进程共享 - 在进程调度时,有可能发生下面的情况:进程 A 还未执行结束,进程 B 就已经抢占了
scr_loc这个共享资源,导致进程 A 没有执行结束(即字符未打印完),而scr_loc的值已经被修改
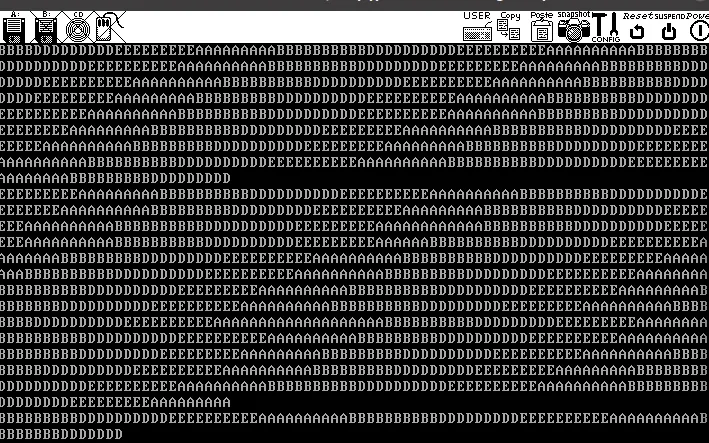
由于在该系统中还没有涉及到 互斥信号量 的概念,因此只能采用屏蔽中断的方法来进行改善。具体实现方法为:在系统中断调用 write_char 方法的前后分别使用 cli 和 sti 指令关中断和开中断。
4.3. 添加键盘中断
在 HEAD.S 程序中,有一个全局的变量 current,代表着当前处于哪一个进程。在此处我们需要添加一个与键盘相关的标志 key_en 来表示当前处于键盘控制的进程中,不使用时钟中断进行进程的调度。
key_en:.long 0 # 处于键盘中断对应的进程中因此,需要在时钟中断处理程序中,增加判断,若 key_en 为有效值,则直接跳过该处理程序。
timer_interrupt: # ... 保护现场及 8259 恢复中断 movl $0, %eax # 将 key_en 与 false 比较 cmpl %eax, key_en # 若相等,则使用默认的轮流调度 jne 5f # 否则使得某个进程单独被调度(跳出时钟中断处理程序) # ... 进程轮流调度程序5: popl %eax # 恢复现场 pop %ds iret键盘中断处理程序中,通过 0x60 端口读取键盘码,进行比较后调用相应的程序 来处理进程的调度。
.align 2keyboard_interrupt:    pushl %edx          # 保护现场    pushl %ecx    pushl %ebx    pushl %eax    push %ds    push %es
    movl $0x10, %eax    # 将 ds, es 设置为内核数据段    mov %ax, %ds    mov %ax, %es
    movb $0x20, %al     # 发出 8259 中断结束信号    outb %al, $0x20
    xorb %al, %al       # 清除 al 和标志位    inb $0x60, %al      # 读取端口    cmpb $0x1e, %al     # 与 A 的键码比较    je 1f               # 切换到进程 0    cmpb $0x30, %al     # 与 B 的键码比较    je 2f               # 切换到进程 1    cmpb $0x20, %al     # 与 D 的键码比较    je 3f               # 切换到进程 2    cmpb $0x12, %al     # 与 E 的键码比较    je 4f               # 切换到进程 3    cmpb $0x2e, %al     # 与 C 的键码比较    je 5f               # 切换回分时调度    jmp 6f              # 这句非常迷惑,但相当关键,相当于 switch 中的 default    # 作用是在默认情况下直接退出键盘中断处理程序,否则会默认继续执行下面的程序1:    call set_e0         # 切换到进程 0    jmp 6f2:    call set_e1         # 切换到进程 1    jmp 6f3:    call set_e2         # 切换到进程 2    jmp 6f4:    call set_e3         # 切换到进程 3    jmp 6f5:    call set_cl         # 切换回分时调度6:    pop %es             # 恢复现场    pop %ds    popl %eax    popl %ebx    popl %ecx    popl %edx    iret
调度程序中,设置 current 的值并使用 ljmp 指令跳转到相应的进程中。
注意:当处于进程 A 时,它不能调度到本身所在的进程,否则就会触发一些错误,导致操作系统重新引导。因此,在调度之前,需要进行一个判断。
.align 8set_e0:    movl $1, key_en    # 强制进入键盘中断    cmpl $0, current    # 判断当前进程是否为 0    je 1f               # 若是,则无需进行进程调度    movl $0, current    # 指定当前进程为 0    ljmp $TSS0_SEL, $0  # 调度到进程 01:  ret
.align 8set_e1:    movl $1, key_en     # 强制进入键盘中断    cmpl $1, current    # 判断当前进程是否为 1    je 1f               # 若是,则无需进行进程调度    movl $1, current    # 指定当前进程为 1    ljmp $TSS1_SEL, $0  # 调度到进程 11:  ret
.align 8set_e2:    movl $1, key_en     # 强制进入键盘中断    cmpl $2, current    # 判断当前进程是否为 2    je 1f               # 若是,则无需进行进程调度    movl $2, current    # 指定当前进程为 2    ljmp $TSS2_SEL, $0  # 调度到进程 21:  ret
.align 8set_e3:    movl $1, key_en     # 强制进入键盘中断    cmpl $3, current    # 判断当前进程是否为 3    je 1f               # 若是,则无需进行进程调度    movl $3, current    # 指定当前进程为 3    ljmp $TSS3_SEL, $0  # 调度到进程 31:  ret
.align 8set_cl:    movl $0, key_en     # 强制退出键盘中断    ret
5. 运行结果
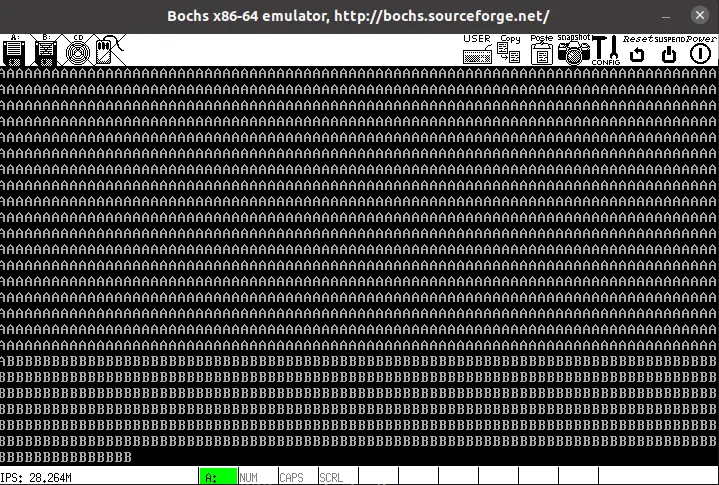
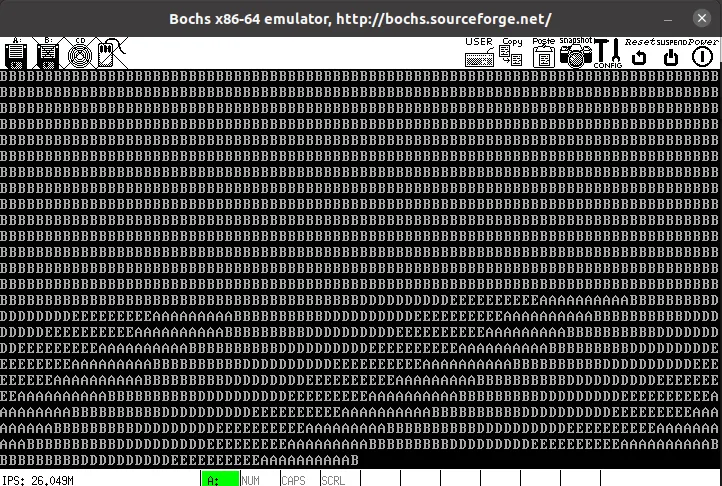
4 个进程轮流调度及滚屏。
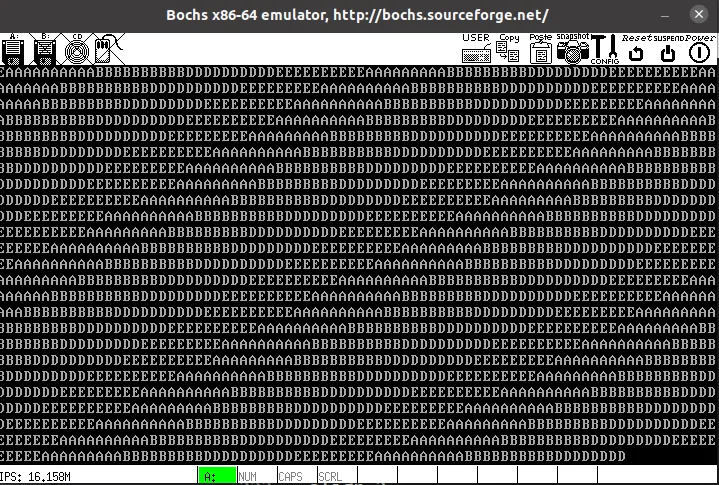
按下键盘的 ABDE 键,分别切换到进程 0123.
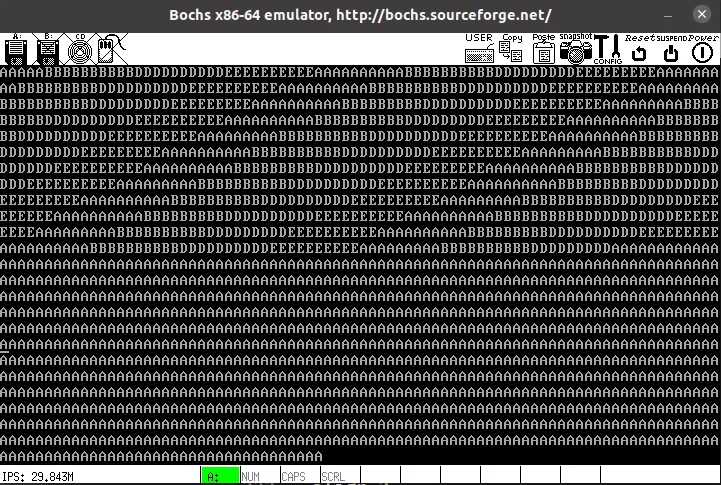
按下键盘的 C 键,恢复到时钟中断轮流调度。
6. 附录:程序代码
6.1. boot.s
!   boot.s!! It then loads the system at 0x10000, using BIOS interrupts. Thereafter! it disables all interrupts, changes to protected mode, and calls the
BOOTSEG = 0x07c0            ! BOOT 将会被加载到内存的绝对地址 0x7C00 处SYSSEG  = 0x1000            ! system loaded at 0x10000 (65536).SYSLEN  = 17                ! sectors occupied.
entry startstart:    jmpi    go,#BOOTSEG     ! (段间)长跳转到 0x7c00 + go(偏移量) 处go: mov ax,cs    mov ds,ax    mov ss,ax    mov sp,#0x400           ! arbitrary value >>512
! ok, we've written the message, nowload_system:    mov dx,#0x0000    mov cx,#0x0002    mov ax,#SYSSEG    mov es,ax    xor bx,bx    mov ax,#0x200+SYSLEN    int     0x13    jnc ok_loaddie:    jmp die
! now we want to move to protected mode ...ok_load:    cli         ! no interrupts allowed ! 关中断    mov ax, #SYSSEG    mov ds, ax          ! ds = 0x10000    xor ax, ax    mov es, ax          ! es = 0x0    mov cx, #0x2000    sub si,si           ! ds : si = 0x10000 : 0000    sub di,di           ! es : di = 0x00000 : 0000    rep                 ! 移动内存,0x10000 => 0x00000    movw    mov ax, #BOOTSEG    mov ds, ax          ! ds = 0x7c00    lidt    idt_48      ! load idt with 0,0    lgdt    gdt_48      ! load gdt with whatever appropriate
! absolute address 0x00000, in 32-bit protected mode.    mov ax,#0x0001  ! protected mode (PE) bit    lmsw    ax      ! This is it ! lmsw是加载机器状态字指令,后接16位寄存器或者内存地址    ! 其功能是用源操作数的低4位加载CR0,也就是说仅会影响CR0的低4位——PE, MP, EM, TS。    jmpi    0,8     ! jmp offset 0 of segment 8 (cs)

! 定义了三个段描述符,其中第一个段不可用gdt:    .word   0,0,0,0     ! dummy
    ! 第1个描述符定义了一个代码段,其基地址为0,界限值是0x7FF(10进制2047),    ! 粒度4KB,DPL=0,非一致性,可读可执行。因为粒度是4KB,所以段长度是(2047+1)*4KB=8MB    .word   0x07FF      ! 8Mb - limit=2047 (2048*4096=8Mb)    .word   0x0000      ! base address=0x00000    .word   0x9A00      ! code read/exec    .word   0x00C0      ! granularity=4096, 386
    ! 第2个描述符定义了一个数据段,其基地址为0,    ! 界限值是0x7FF(10进制2047),粒度4KB,DPL=0,向上扩展,可读可写。段长度是8MB    .word   0x07FF      ! 8Mb - limit=2047 (2048*4096=8Mb)    .word   0x0000      ! base address=0x00000    .word   0x9200      ! data read/write    .word   0x00C0      ! granularity=4096, 386
idt_48: .word   0           ! idt limit=0    .word   0,0             ! idt base=0Lgdt_48: .word   0x7ff       ! gdt limit=2048, 256 GDT entries    .word   0x7c00+gdt,0    ! gdt base = 07xxx.org 510    .word   0xAA55
6.2. head.s
##  head.s contains the 32-bit startup code.##  Two L3 task multitasking. The code of tasks are in kernel area,##  just like the Linux. The kernel code is located at 0x10000.SCRN_SEL    = 0x18  # 显存段TSS0_SEL    = 0x20  # 任务状态段 0, 占 8 ByteLDT0_SEL    = 0x28  # 局部描述符表 0, 占 8 ByteTSS1_SEL    = 0x30  # 任务状态段 1, 占 8 ByteLDT1_SEL    = 0x38  # 局部描述符表 1, 占 8 ByteTSS2_SEL    = 0x40  # 任务状态段 2, 占 8 ByteLDT2_SEL    = 0x48  # 局部描述符表 2, 占 8 ByteTSS3_SEL    = 0x50  # 任务状态段 3, 占 8 ByteLDT3_SEL    = 0x58  # 局部描述符表 3, 占 8 Byte
.code32.global startup_32.textstartup_32:    movl $0x10,%eax    mov %ax,%ds##   mov %ax,%es    lss init_stack,%esp     # init_stack => ss:%esp
## setup base fields of descriptors.    call setup_idt          # 建立 ldt 表    call setup_gdt          # 建立 gdt 表    movl $0x10,%eax         # reload all the segment registers    mov %ax,%ds             # after changing gdt.    mov %ax,%es    mov %ax,%fs    mov %ax,%gs             # 更改 gdt 表后重载所有段寄存器    lss init_stack,%esp     # init_stack => ss:%esp
## setup up timer 8253 chip. 初始化 8253    movb $0x36, %al         # 控制字 36H = 00 11 01 10 B    movl $0x43, %edx        # 控制端口    outb %al, %dx           # 通道 0, 16 位, 方式 3(方波), 二进制计数    movl $11930, %eax       # timer frequency 100 HZ    movl $0x40, %edx        # 0 号端口    outb %al, %dx           # 将计数数字写入 8253 (8253 是 16 位的)    movb %ah, %al           # 老师所说的10Hz, 似乎是不能只用一个通道实现的    outb %al, %dx           # 因为 119300 > 2^16-1
## setup timer & system call interrupt descriptors. 初始化时钟中断和系统中断    movl $0x00080000, %eax          # cs = 0x0008    movw $timer_interrupt, %ax      # %eax 中放时钟中断基址    movw $0x8E00, %dx               # (?)    movl $0x08, %ecx                # The PC default timer int. 时钟中断向量号为 08H    lea idt(,%ecx,8), %esi          # 更改第 8 项中断(每个中断占 8 Byte)    movl %eax,(%esi)    movl %edx,4(%esi)    movw $system_interrupt, %ax     # 系统中断基址    movw $0xef00, %dx               # 没有做模式切换, 状态没有从 11B 变为 00B (?)    movl $0x80, %ecx                # 系统中断向量号为 80H    lea idt(,%ecx,8), %esi          # 更改系统中断    movl %eax,(%esi)    movl %edx,4(%esi)    movw $keyboard_interrupt, %ax   # 键盘中断基址    movw $0x8e00, %dx    movl $0x09, %ecx                # 键盘中断向量号为 09H    lea idt(,%ecx,8), %esi          # 更改键盘中断    movl %eax,(%esi)    movl %edx,4(%esi)
## unmask the timer interrupt.##   movl $0x21, %edx##   inb %dx, %al##   andb $0xfe, %al##   outb %al, %dx
## Move to user mode (task 0)  为启动任务 0 做准备    pushfl                  # eflags 入栈    andl $0xffffbfff, (%esp) # 置 flag, 中断位清零    popfl    movl $TSS0_SEL, %eax    ltr %ax                 # 加载 TSS    movl $LDT0_SEL, %eax    lldt %ax                # 加载 LDT    movl $0, current        # 准备启动 0    sti                     # 开中断    pushl $0x17             # 压 ss    pushl $init_stack       # 压用户栈, init_stack 成为 task0 的用户栈    pushfl                  # 压 eflag    pushl $0x0f             # 压 cs, cs 末 2 位为 11B, 即进入 11 用户级(00 为内核级)    pushl $task0            # 压 eip    iret                    # 返回时自动弹出, 进入 task0, 因此 tss0 表内容得以初始化
/****************************************/setup_gdt:    lgdt lgdt_opcode        # 加载 GDT    ret
setup_idt:    lea ignore_int,%edx     # 哑中断基址 => %edx    movl $0x00080000,%eax   # cs = 0x0008    movw %dx,%ax            # selector = 0x0008 = cs    movw $0x8E00,%dx        # interrupt gate - dpl=0, present    lea idt,%edi            # 中断向量表基址 => %edi    mov $256,%ecx           # 循环次数rp_sidt:                    # %eax 中放了 cs:哑中断基址    movl %eax,(%edi)        # 将哑中断门描述符存入表中    movl %edx,4(%edi)    addl $8,%edi    dec %ecx    jne rp_sidt             # 将 256 个中断全部置为哑中断    lidt lidt_opcode        # 加载中断描述符表寄存器值    ret
## -----------------------------------write_char:    push %gs                # 保存现场    pushl %ebx##   pushl %eax    mov $SCRN_SEL, %ebx     # 显存的段选择子    mov %bx, %gs            # 放入 %gs    mov scr_loc, %bx        # %bx 中放光标位移(其实是偏移)    shl $1, %ebx            # 左移, 写高字节(高字节表示 ASCII 码值)    movb %al, %gs:(%ebx)    # 将 %al 的内容写到光标处    shr $1, %ebx            # 右移恢复    incl %ebx               # 指针后移    cmpl $2000, %ebx        # 与 2000 相比    jb 2f                   # 如果 ebx < 2000, 则跳转到 2f    call roll_screen    movl $1920, %ebx        # 最下面一行的行首2:  movl %ebx, scr_loc      # 直接将 ebx 赋值给 scr_loc, 返回##   popl %eax    popl %ebx               # 恢复现场    pop %gs    ret
.align 2roll_screen:    # ebx >= 2000 时, 将屏幕上的字符向上滚动    push %ds    mov $SCRN_SEL, %ebx     # 获取显存段地址(0xb8000)    mov %bx, %ds    mov %bx, %es    movl $160, %ebx    movl %ebx, %esi         # DS:esi (源地址)    movl $0, %ebx    movl %ebx, %edi         # ES:edi (目的地址)
    movl $1920, %ecx        # 循环次数    cld                     # 清除增量位(向后移动, 即 si = si + 2, di = di + 2)    rep    movsw                   # 使用 rep 指令前缀, 用 movw 搬动字符    # 将最下面一行清空    movl $80, %ecx    pushl %eax    movl $0x0700, %eax      # 背景色黑, 前景色白, 字符为 00H    cld    rep    stosw                   # 将 ax 寄存器的内容送到 di 指向的单元中    popl %eax    pop %ds    ret
/***********************************************//* This is the default interrupt "handler" :-) */.align 2ignore_int:                 # 哑中断    push %ds                # 保护现场    pushl %eax    movl $0x10, %eax    mov %ax, %ds            # 使用 gdt 表的第 2 项    movl $67, %eax          # print 'C'    call write_char         # 调用 write_char    popl %eax               # 恢复现场    pop %ds    iret
/* Timer interrupt handler */.align 2timer_interrupt:        # 时钟中断 (TODO)    push %ds    pushl %eax          # 保护现场    movl $0x10, %eax    mov %ax, %ds        # 使用 gdt 表的第 2 项    movb $0x20, %al     # 8259A    outb %al, $0x20     # 恢复中断
    movl $0, %eax       # 将 key_en 与 false 比较    cmpl %eax, key_en   # 若相等,则使用默认的轮流调度    jne 5f              # 否则使得某个进程单独被调度(跳出时钟中断处理程序)
    movl $0, %eax    cmpl %eax, current  # 判断当前进程是否为 0    je 1f               # 为 0 则跳到 1 处, 切换为进程 1
    movl $1, %eax    cmpl %eax, current  # 判断当前进程是否为 1    je 2f               # 为 1 则跳到 2 处, 切换为进程 2
    movl $2, %eax    cmpl %eax, current  # 判断当前进程是否为 2    je 3f               # 为 2 则跳到 3 处, 切换为进程 3
    movl $3, %eax    cmpl %eax, current  # 判断当前进程是否为 3    je 4f               # 为 3 则跳到 4 处, 切换为进程 0
1:    movl $1, current    # 设置进程为 1    ljmp $TSS1_SEL, $0  # 跳转到进程 1, 存下当前快照    jmp 5f2:    movl $2, current    # 设置进程为 2    ljmp $TSS2_SEL, $0  # 跳转到进程 2, 存下当前快照    jmp 5f3:    movl $3, current    # 设置进程为 3    ljmp $TSS3_SEL, $0  # 跳转到进程 3, 存下当前快照    jmp 5f4:    movl $0, current    # 设置进程为 0    ljmp $TSS0_SEL, $0  # 跳转到进程 0, 存下当前快照5:    popl %eax           # 恢复现场    pop %ds    iret
/* system call handler */.align 2system_interrupt:       # 系统中断    push %ds            # 保护现场    pushl %edx    pushl %ecx    pushl %ebx    pushl %eax    movl $0x10, %edx    mov %dx, %ds        # 使用 gdt 表的第 2 项    cli                 # 关中断    call write_char     # 写字符    sti                 # 开中断    popl %eax           # 恢复现场    popl %ebx    popl %ecx    popl %edx    pop %ds    iret
## 键盘中断.align 2keyboard_interrupt:    pushl %edx          # 保护现场    pushl %ecx    pushl %ebx    pushl %eax    push %ds    push %es
    movl $0x10, %eax    # 将 ds, es 设置为内核数据段    mov %ax, %ds    mov %ax, %es
    movb $0x20, %al     # 发出 8259 中断结束信号    outb %al, $0x20
    xorb %al, %al       # 清除标志位    inb $0x60, %al      # 读取端口    cmpb $0x1e, %al     # 与 A 的键码比较    je 1f    cmpb $0x30, %al     # 与 B 的键码比较    je 2f    cmpb $0x20, %al     # 与 D 的键码比较    je 3f    cmpb $0x12, %al     # 与 E 的键码比较    je 4f    cmpb $0x2e, %al     # 与 C 的键码比较    je 5f    jmp 6f              # 这句非常迷惑,但相当关键,相当于 switch 中的 default    # 作用是在默认情况下直接退出键盘中断处理程序,否则会默认继续执行下面的程序1:    call set_e0         # 切换到进程 0    jmp 6f2:    call set_e1         # 切换到进程 1    jmp 6f3:    call set_e2         # 切换到进程 2    jmp 6f4:    call set_e3         # 切换到进程 3    jmp 6f5:    call set_cl         # 切换回分时调度6:    pop %es             # 恢复现场    pop %ds    popl %eax    popl %ebx    popl %ecx    popl %edx    iret
## 处理键盘按下后的程序## 注意:当前的进程为 0 时,不能重新调度为进程 0## 也就是说,不用 ljmp 指令来使得进程重新跳回自己
.align 8set_e0:    movl $1, key_en     # 强制进入键盘中断    cmpl $0, current    # 判断当前进程是否为 0    je 1f               # 若是,则无需进行进程调度    movl $0, current    # 指定当前进程为 0    ljmp $TSS0_SEL, $0  # 调度到进程 01:  ret
.align 8set_e1:    movl $1, key_en     # 强制进入键盘中断    cmpl $1, current    # 判断当前进程是否为 1    je 1f               # 若是,则无需进行进程调度    movl $1, current    # 指定当前进程为 1    ljmp $TSS1_SEL, $0  # 调度到进程 11:  ret
.align 8set_e2:    movl $1, key_en     # 强制进入键盘中断    cmpl $2, current    # 判断当前进程是否为 2    je 1f               # 若是,则无需进行进程调度    movl $2, current    # 指定当前进程为 2    ljmp $TSS2_SEL, $0  # 调度到进程 21:  ret
.align 8set_e3:    movl $1, key_en     # 强制进入键盘中断    cmpl $3, current    # 判断当前进程是否为 3    je 1f               # 若是,则无需进行进程调度    movl $3, current    # 指定当前进程为 3    ljmp $TSS3_SEL, $0  # 调度到进程 31:  ret
.align 8set_cl:    movl $0, key_en     # 强制退出键盘中断    ret
/*********************************************/current:.long 0         # 当前进程scr_loc:.long 0         # 光标位置key_en:.long 0          # 处于键盘中断对应的进程中
.align 2lidt_opcode:    .word 256*8-1       # idt contains 256 entries 256 个中断入口    .long idt       # This will be rewrite by code.lgdt_opcode:    .word (end_gdt-gdt)-1   # so does gdt    .long gdt       # This will be rewrite by code.
    .align 8idt:    .fill 256,8,0       # idt is uninitialized 256 个中断
gdt:    .quad 0x0000000000000000    # NULL descriptor           # 第 0 号不用    .quad 0x00c09a00000007ff        # 8Mb 0x08, base = 0x00000  # 第 1 号只读代码段    .quad 0x00c09200000007ff        # 8Mb 0x10                  # 第 2 号可读可写数据段    .quad 0x00c0920b80000002        # screen 0x18 - for display # 第 3 号为显存
    .word 0x0068, tss0, 0xe900, 0x0 # TSS0 descr 0x20    .word 0x0040, ldt0, 0xe200, 0x0 # LDT0 descr 0x28    .word 0x0068, tss1, 0xe900, 0x0 # TSS1 descr 0x30    .word 0x0040, ldt1, 0xe200, 0x0 # LDT1 descr 0x38    .word 0x0068, tss2, 0xe900, 0x0 # TSS2 descr 0x40    .word 0x0040, ldt2, 0xe200, 0x0 # LDT2 descr 0x48    .word 0x0068, tss3, 0xe900, 0x0 # TSS2 descr 0x50    .word 0x0040, ldt3, 0xe200, 0x0 # LDT2 descr 0x58end_gdt:    .fill 128,4,0init_stack:                         # Will be used as user stack for task0.    .long init_stack    .word 0x10
/*************************************/.align 8ldt0:   .quad 0x0000000000000000    # 0 号不用    .quad 0x00c0fa00000003ff        # 0x0f, base = 0x00000, 1 号只读    .quad 0x00c0f200000003ff        # 0x17                  2 号可读可写
tss0:   .long 0                 /* back link */    .long krn_stk0, 0x10        /* esp0, ss0 */    .long 0, 0, 0, 0, 0         /* esp1, ss1, esp2, ss2, cr3 */    .long 0, 0, 0, 0, 0         /* eip, eflags, eax, ecx, edx */    .long 0, 0, 0, 0, 0         /* ebx esp, ebp, esi, edi */    .long 0, 0, 0, 0, 0, 0      /* es, cs, ss, ds, fs, gs */    .long LDT0_SEL, 0x8000000   /* ldt 段选择符, trace bitmap */
    .fill 128,4,0krn_stk0:##   .long 0
/************************************/.align 8ldt1:   .quad 0x0000000000000000    # 0 号不用    .quad 0x00c0fa00000003ff        # 0x0f, base = 0x00000, 1 号只读    .quad 0x00c0f200000003ff        # 0x17                  2 号可读可写
tss1:   .long 0                         /* back link */    .long krn_stk1, 0x10                /* esp0, ss0 */    .long 0, 0, 0, 0, 0                 /* esp1, ss1, esp2, ss2, cr3 */    .long task1, 0x200                  /* eip, eflags */    .long 0, 0, 0, 0                    /* eax, ecx, edx, ebx */    .long usr_stk1, 0, 0, 0             /* esp, ebp, esi, edi */    .long 0x17,0x0f,0x17,0x17,0x17,0x17 /* es, cs, ss, ds, fs, gs */    .long LDT1_SEL, 0x8000000           /* ldt 段选择符, trace bitmap */
    .fill 128,4,0krn_stk1:
/************************************/.align 8ldt2:   .quad 0x0000000000000000    # 0 号不用    .quad 0x00c0fa00000003ff        # 0x0f, base = 0x00000, 1 号只读    .quad 0x00c0f200000003ff        # 0x17                  2 号可读可写
tss2:   .long 0                         /* back link */    .long krn_stk2, 0x10                /* esp0, ss0 */    .long 0, 0, 0, 0, 0                 /* esp1, ss1, esp2, ss2, cr3 */    .long task2, 0x200                  /* eip, eflags */    .long 0, 0, 0, 0                    /* eax, ecx, edx, ebx */    .long usr_stk2, 0, 0, 0             /* esp, ebp, esi, edi */    .long 0x17,0x0f,0x17,0x17,0x17,0x17 /* es, cs, ss, ds, fs, gs */    .long LDT2_SEL, 0x8000000           /* ldt 段选择符, trace bitmap */
    .fill 128,4,0krn_stk2:
/************************************/.align 8ldt3:   .quad 0x0000000000000000    # 0 号不用    .quad 0x00c0fa00000003ff        # 0x0f, base = 0x00000, 1 号只读    .quad 0x00c0f200000003ff        # 0x17                  2 号可读可写
tss3:   .long 0                         /* back link */    .long krn_stk3, 0x10                /* esp0, ss0 */    .long 0, 0, 0, 0, 0                 /* esp1, ss1, esp2, ss2, cr3 */    .long task3, 0x200                  /* eip, eflags */    .long 0, 0, 0, 0                    /* eax, ecx, edx, ebx */    .long usr_stk3, 0, 0, 0             /* esp, ebp, esi, edi */    .long 0x17,0x0f,0x17,0x17,0x17,0x17 /* es, cs, ss, ds, fs, gs */    .long LDT3_SEL, 0x8000000           /* ldt 段选择符, trace bitmap */
    .fill 128,4,0krn_stk3:
/************************************/task0:    movl $0x17, %eax    movw %ax, %ds               # 使用 ldt 表的第 2 项    mov $65, %al                # %al 中放入 A 的 ASCII 码    int $0x80                   # 调用系统中断, 输出字符    movl $0xfff, %ecx1:  loop 1b                     # 延迟    jmp task0
task1:    movl $0x17, %eax    movw %ax, %ds               # 使用 ldt 表的第 2 项    mov $66, %al                # %al 中放入 B 的 ASCII 码    int $0x80                   # 调用系统中断, 输出字符    movl $0xfff, %ecx1:  loop 1b                     # 延迟    jmp task1
task2:    movl $0x17, %eax    movw %ax, %ds               # 使用 ldt 表的第 2 项    mov $68, %al                # %al 中放入 D 的 ASCII 码    int $0x80                   # 调用系统中断, 输出字符    movl $0xfff, %ecx1:  loop 1b                     # 延迟    jmp task2
task3:    movl $0x17, %eax    movw %ax, %ds               # 使用 ldt 表的第 2 项    mov $69, %al                # %al 中放入 E 的 ASCII 码    int $0x80                   # 调用系统中断, 输出字符    movl $0xfff, %ecx1:  loop 1b                     # 延迟    jmp task3
    .fill 128,4,0usr_stk1:    .fill 128,4,0usr_stk2:    .fill 128,4,0usr_stk3:
6.3. makefile
## Makefile for the simple example kernel.AS86  =as86 -0 -aLD86  =ld86 -0AS  =as --32LD  =ldLDFLAGS =-m elf_i386 -Ttext 0 -e startup_32 -s -x -M
all:  Image
Image: boot system  dd bs=32 if=boot of=Image skip=1  objcopy -O binary system head  cat head >> Image
disk: Image  dd bs=8192 if=Image of=/dev/fd0  sync;sync;sync
head.o: head.s
system:  head.o  $(LD) $(LDFLAGS) head.o  -o system > System.map
boot:  boot.s  $(AS86) -o boot.o boot.s  $(LD86) -s -o boot boot.o
clean:  rm -f  System.map core boot head *.o system
6.4. bochs_linux00.bxrc
romimage: file=$BXSHARE/BIOS-bochs-latestvgaromimage: file=$BXSHARE/VGABIOS-lgpl-latestmegs: 16floppya: 1_44="Image", status=insertedboot: alog: bochsout.txt